Wednesday, August 31, 2011

Favorite Things In My Town


If you've been with me from the beginning you know I love where I live (see that first post here). This July marked our third year in Seattle and there is definitely no going back (sorry mom). What I really love about it here is that even though I am within walking distance of downtown Seattle and all of its glory I don't actually feel like I live down town.

Here on Queen Anne Hill we get the best of all things Seattle. I'm sure all of you know this sky line
Via Here

This is the view from Kerry Park just 6 blocks from our house. Queen Anne is filled with parks and green space (like the one we got married in) that just come alive in the spring and summer. How gorgeous are these Irises?


And then fall comes and it looks like this


To this SoCal girl seasons are just so novel. Some times it even snows! (I know, most of you get this every year but it rarely happens in Seattle which makes it all the more special)

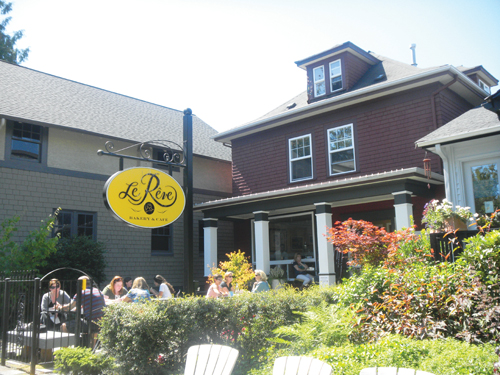
Besides the three grocery shops all in walking distance (which just about makes this the most perfect place on earth) we also have the cutest little shopping district on Queen Anne Ave. There are tons of boutiques and restaurants to fill anyone's shopping desires. Here are some of my faves (but there are plenty more)

Le Reve Bakery, a french pastry shop with some of the best macrons I've ever had. 


Chocolopolis (my sometime employer where I work as a chocolatier during the busy season) which will happily fill any chocolate craving. 

Chocolopolis

Three Birds (which is new to us) but has a great collection of home goods
here
And the 5 Spot which is a great classic diner that comes up with a new regional menu every few months. Some of my favorites have been D.C. and Portland.

Photos

It can be difficult to get here (especially if you walk up the hill) but it is worth the effort! Hope this inspires you to come visit our neck of the woods.

Cheers!

Seeing Spots

I'm well into my list of lists (see here) and am happy to say I've got another one checked off (not working really makes getting things done easier. I'm so impressed by all you bloggers out there with kids/jobs/lives unlike me).

I was inspired by this picture from Apartment Therapy

here

And of course Pinterest supplied me with a few more ideas like this one which you can buy from the lovely and talented etsy artist. 

here

Needless to say I just had to do it. The only thing stopping me was the round punch. Why are they so expensive? Lucky for all of us Joann's always has coupons so when I got mine I went out and picked up a 1 1/2 inch Fiskar round punch. A piece of poster board and an Ikea frame later I had this lovely piece for my downstairs bath


I used up all of my green paint chips from the kitchen (we finally chose a color but no paint yet) and the one coral colored one in the corner from a jewelry box I haven't showed you yet (I am waiting for its home to be done).

Here is how it looks in the bathroom. I tried every setting on my camera to get a better picture in there but it just wasn't happening (hence the picture on the floor above). 


I love it. It is big and takes up the wall much better than this one did (from the original reveal here)

Original

New


So there you have it. I finally finished that art. Gotta love paint chip projects! Did you see this one over at The Lettered Cottage's How To Link Up? I'm a big fan

Via Suburban Spunk

Suzanne whipped up two of these for her laundry room. Couldn't you just DIE?? I'm seeing one in my house inspiration colors for my gallery wall in the making. 

Tuesday, August 30, 2011

Back Porch Progress

As promised here is a look at a little progress that has been made on the back porch.

Before


 Progress


No more Astro Turf, no more security door. I am amazed at how much light comes into our breakfast nook now. No clue what I'm going to do with the porch part. There is always painting but I kind of want to do something a little more solid. Though I may go crazy and paint anyway. We'll see! Much more to come with this space so watch out!

Cheers!

Monday, August 29, 2011

Head 'em Up, Move 'em Out

Anyone else find themselves wandering around singing the rawhide song? Just me? Oh well... Anyhoo like so many lists before getting what I wanted to get done written down really helped push me forward this weekend. We scratched four  projects (well two full projects and two half projects) off my pledge list. Plus I scratched an entire project off. Here she is (read all about the pledge in this post)

Finish:
  • repaint the dresser in our bedroom
  • finish the art for the guest bath
  • build my seating for the back porch Scratched. At least until I think about the logistics a bit more.
  • paint and re-screen the screen door
  • move the library and office
  • remove AstroTurf on back porch
  • remove security door on back door and paint
  • build shed
  • finish tray 
  • fix bathroom drawer
  • clean up cuttings in the yard - Filled up two barrels of trimmings but still more to do
  • Get cutting on some cans (for an art project)
  • Paint the front door
  • reupholster new chair
Pictures and updates to come! I swear it doesn't matter that I think I have what I need for a project there always seems to be something I'm missing so I'm off to pick up a few things to cross more off my list. 

Friday, August 26, 2011

Half Baked, Half Cocked, Half Done

Story of my life.

Since I picked up and left last Wednesday (I got a call Tuesday night that I was needed and was on a plane Wednesday morning bound for Minnesota to help out) there are a lot of projects sitting around half done. It's a long drive from Minnesota to Seattle so I had plenty of time to think about the house and came to this conclusion: I have too much on my plate. It seems to be a contagious disease in the blog world. Everywhere you look people are overwhelmed with their houses and their lives (kids or no) and I decided it was time to do something about it. So I'm making a pledge. I will not start any new project until the ones I have already started are done. Here's my half done list

Finish:
  • repaint the dresser in our bedroom
  • finish the art for the guest bath
  • build my seating for the back porch
  • paint and re-screen the screen door
  • move the library and office
  • remove AstroTurf on back porch
  • remove security door on back door and paint
  • build shed
  • finish tray 
  • fix bathroom drawer
  • clean up cuttings in the yard
  • Get cutting on some cans (for an art project)
  • Paint the front door
  • reupholster new chair
Everything is already purchased for all of these projects, I just haven't either followed through or in some cases even started them. Then of course there is the list of new things I want to start which always sound much more fun than any of my current projects. But, they are piling up and it is starting to stress me out so I take the pledge.

I, Emily Keller, do here by pledge to finish what I've started and in doing so regain some semblance of order and sanity in my house and life. 

Please somebody tell me I'm not the only one. We need a support group people!
Cheers!

Thursday, August 25, 2011

How Can You Not?

One of my favorite things about traveling is going to new thrift stores. There is just such a range of things people give away and it is fun to see what is out there. In fact, some of my favorite thrift store finds have been from non local stores. So how excited was I when we were getting off the freeway in Spokane, WA for gas and I see the Goodwill sign. It was like choirs of angels began singing. Of course we had to stop and as always I made a b-line to the furniture section (this is always my first stop). I was mightily rewarded (if I do say so myself). Ok, I know orange velvet isn't exactly chic. Reupholstering is definitely in this chairs future.


Just look at the details. I love the caning on the arms and the art deco legs.


The only thing I am kicking myself over is that I didn't get both! This is why....


I bought the chair for the corner where it is now but it just doesn't match with the 70's style upholstered green chair. The lines clash. My green chair is all squat and dumpy next to the romantic lines of the orange chair. Of course since I got it at the thrift store in Spokane I can't even go back for the other one. Oh well. For a 20$ investment I will find somewhere it fits but until I know where it will go it will stay orange. It will make a good winter project. Anyone else cursed like I am with bringing home furniture only to find out it doesn't fit where you think it will? Maybe my sense of proportion will get better with age?

Cheers!

Wednesday, August 24, 2011

Road Trip Color Palettes

Our road trip took us through six states and quite a few attractions so I thought I'd use this post to not only highlight a few but also show you a fun little tool that you may not have seen before. Thank you Creature Comforts for your tutorial on how to use the Color Palette Generator from DeGrave. It is super easy to use, the only hitch is that your picture needs to be hosted on the web for it to work. If you use Blogger you already have a Picassa account so you are good. If not, I'm sure any other web hosted site would work. 

Here's the process:

Once you have your picture online go to your picture and right click on it. Then click Copy URL (see below)


In another tab or window open the Color Palette Generator. Paste the URL into the link. 


Click the Color Palette-ify and you are done!


Corn Palace Palette anyone? 

Maybe you'd love to have a house styled after this prairie afternoon?


Perhaps Yellowstone's bubbling pools are more your cup of tea?

 Chipmunk Chic anyone?
I love the moody pinks and greens of Badlands South Dakota. What a beautiful place.

So there you have it, a neat design tool and some pictures from my road trip all rolled in to one. If you are interested in seeing more they are up on my Facebook for all to see.

Cheers!

Weekend Bloggy Reading

Tuesday, August 23, 2011

There's No Place Like Home

and I've got the ruby golden slippers to get me there.

After an unplanned mini vacation/road trip from Minnesota it is just nice to be back in my own bed with my man and my dog. I had a fun if stressful time driving my mom back to Seattle and we tried to make the best of the trip by stopping at some fun touristy things on the way (more on that later). For now I am going to catch up on some blogging and bloggy reading (I swear I went through withdrawals while I was gone) and nurse the cold I got somewhere in the prairies of Montana.

Hope everyone had a fabulous weekend. I can't wait to see what you all have been up to while I was gone! 

Cheers!

Friday, August 19, 2011

Sunshine In My Life

I have to say, I really do love the new Weight Watchers ads, but that has nothing to do with this post. Though this post is about Sun. Particularly, Sunburst mirrors. Love them or hate them I am pretty sure these things are here to stay and I for one am happy about this (check out everyone's opinion over at The Mustard Ceiling).

I've been planning on making a sunburst mirror since I say the one Kimberly at Third Floor Design Studio made. Isn't it pretty?

I also really liked this one at Ten June


Mine is a bit of a cross between the two. 


Here's what I used:
  • 1 pack of bamboo skewers (mine were 10")
  • 5 inch wood plaque
  • round mirror
  • glue gun
  • cardboard
  • picture hanger

They didn't give very detailed steps so I though I'd give you mine in case you wanted to make one too!

I started out dissecting my plaque into 8 sections and gluing un cut skewers to the ends. These were my longest point. I used some corks to hold them level while they dried since my plaque is thick.


Then I trimmed down 4 sets of 2 skewers taking 1/2" more off of each subsequent set (to break it down I cut 2-9 1/2" skewers 2- 9" skewers, 2- 8 1/2" skewers, and 2- 8" skewers for each section with a 7 1/2" skewer in the middle).  Then glue away. 


I used the corks all around to keep everything level and even while the glue dried. It took forever but when we were done it looked like this


that's a whole lotta glue. Once it was dry I glued the cardboard circle I cut out on to the back and took it out to spray paint (I let it dry over night to be sure everything would stay together). 

After it was dry and golden I attached the picture hanger. This was a little dicey hammering into the back of the plaque so I might suggest doing this before everything is glued on.


Then I hung it in its intended spot. My mantle.


I like it there. It goes with the brass in the chandelier and it is big enough to fill the space nicely. I arranged a few of my favorite things to round it out (anyone else need a course in mantel arranging?). I included the anniversary painting I made for Daniel as well as a few of my favorite books and some pictures. It even got a thumbs up from Daniel (which shocked me) but I'm not sold on the teal and green... we'll see. 

What do you think? Nothing ever seems to stay in the same spot for long in my house so you may be seeing this in the bedroom or library later but I am proud of how nicely it turned out. I think it could hold up to any of the more expensive models. My cost on this? 6$ (I already had the mirror). Sweet! 

Cheers!

Linking up to
  Metamorphosis Monday@ Between Naps on The Porch
Good Life Wednesdays @ A Beach Cottage

The Lettered Cottage